_edited_edited_pn.png)
Master the Art of Professional Property Photography
- Colby Hollins
- Sep 30, 2025
- 4 min read

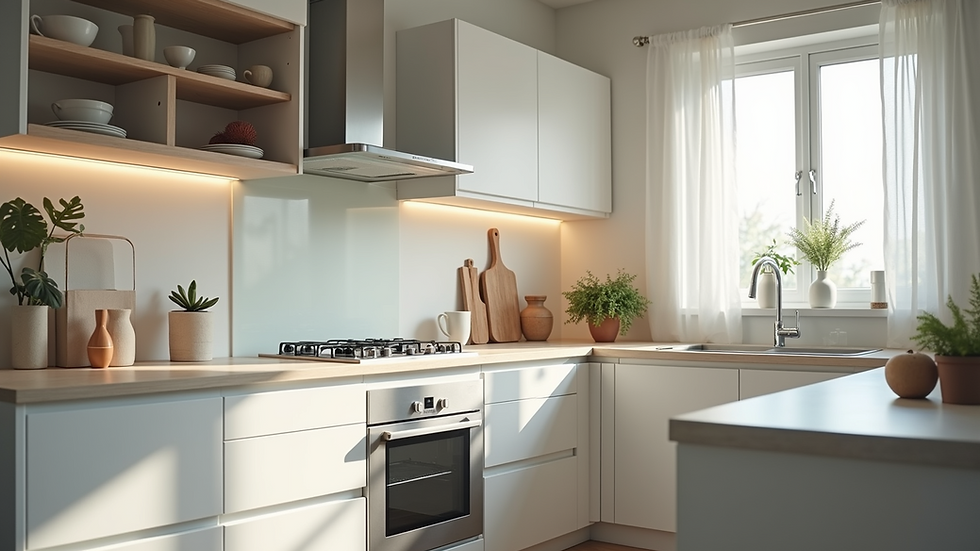
Capturing the essence of a property through photography is both an art and a science. Whether you are a real estate agent, a property manager, or a photographer looking to specialize, mastering expert property photo tips can significantly enhance the appeal of any listing. Great photos attract more viewers, generate more interest, and ultimately help sell or rent properties faster. This guide will walk you through practical steps and techniques to elevate your property photography skills.
Essential Expert Property Photo Tips for Stunning Images
To create compelling property photos, you need to focus on several key elements. Lighting, composition, and preparation are crucial to showcasing a space in its best light.
Use natural light whenever possible. Open curtains and blinds to let in sunlight. Avoid harsh midday sun that creates strong shadows; early morning or late afternoon light is softer and more flattering.
Declutter and stage the space. Remove personal items and excess furniture to make rooms appear larger and more inviting. Add simple decor like fresh flowers or tasteful cushions to create warmth.
Choose the right angles. Shoot from eye level or slightly above to capture the room’s depth. Corners often work well to show the full layout.
Use a wide-angle lens. This helps capture more of the room in one shot, making spaces look bigger and more open.
Keep the camera steady. Use a tripod to avoid blurry images and maintain consistent framing.
Adjust white balance. Ensure colors look natural and true to life by setting the correct white balance on your camera.
By applying these tips, you can create images that highlight the best features of any property and appeal to potential buyers or renters.

How to Prepare a Property for a Photoshoot
Preparation is key to professional-looking property photos. Before you start shooting, take time to get the property ready.
Clean thoroughly. A spotless home looks more attractive and well-maintained.
Fix minor repairs. Replace broken tiles, tighten loose handles, and touch up paint where needed.
Enhance curb appeal. Mow the lawn, trim bushes, and sweep pathways to create a welcoming exterior.
Stage rooms thoughtfully. Arrange furniture to maximize space and flow. Remove bulky or outdated pieces.
Control lighting. Turn on all lights to brighten dark corners and create a warm atmosphere.
Remove distractions. Hide cables, remove trash bins, and keep pets out of the frame.
These steps ensure the property looks its best and helps you capture images that truly represent the space.
What is the 20 60 20 Rule in Photography?
The 20 60 20 rule is a composition guideline that helps balance images and draw the viewer’s eye effectively. It divides the frame into three horizontal sections:
20% foreground - This area adds depth and context to the photo.
60% middle ground - The main subject or focus of the image should occupy this space.
20% background - Provides a backdrop that complements the subject without distracting.
Applying this rule in property photography means positioning key elements like furniture, architectural features, or decor within the middle 60% of the frame. The foreground could include a rug or coffee table, while the background might be a window or wall art. This balance creates visually appealing photos that feel natural and inviting.
Try experimenting with this rule when framing rooms or exterior shots to improve composition and storytelling.

Using Equipment and Editing to Enhance Your Photos
While good technique is essential, the right equipment and post-processing can elevate your images further.
Camera: A DSLR or mirrorless camera with manual settings offers the best control. However, modern smartphones with wide-angle lenses can also produce excellent results.
Tripod: Stabilizes your camera for sharp images and consistent framing.
Remote shutter release: Prevents camera shake when taking photos.
Lens: A wide-angle lens (10-24mm for crop sensors or 16-35mm for full-frame) is ideal for interiors.
Editing software: Use programs like Adobe Lightroom or Photoshop to adjust brightness, contrast, and color balance. Correct lens distortion and remove minor imperfections.
Editing should enhance the photo without making it look unnatural. Aim for bright, clear images that accurately represent the property.
Why Professional Property Photography Matters
Investing in professional property photography can make a significant difference in how a property is perceived. High-quality images:
Attract more potential buyers or renters online.
Increase the perceived value of the property.
Reduce time on the market by generating more interest.
Help listings stand out in competitive markets.
Even if you are taking photos yourself, applying expert tips and techniques can bring your images closer to professional standards. Remember, the goal is to showcase the property’s best features and create an emotional connection with viewers.
Final Thoughts on Mastering Property Photography
Mastering expert property photo tips requires practice, patience, and attention to detail. By focusing on lighting, composition, preparation, and post-processing, you can create images that truly highlight a property’s potential. Whether you are photographing a cozy apartment or a spacious family home, these strategies will help you capture stunning photos that attract and engage viewers.
Keep experimenting with different angles, lighting conditions, and staging ideas to find what works best for each property. With dedication and the right approach, you can master the art of property photography and make every listing shine.


Comments